Welcome to the Dialog Tutorial! Here we will be going over how to create a dialog, with pictures!
If you do not have version 0.3.4 of ERC, download it now from the Installation page.
Dialog With Name[]
First, we're going to show you how to create a dialog that features a name box. We'll be using the Dialog that comes with the ERC download.
First, open Scene Test and go to the "Events" page. We're going to add in a "When Created" event and add in the following:
Do After .2 Seconds
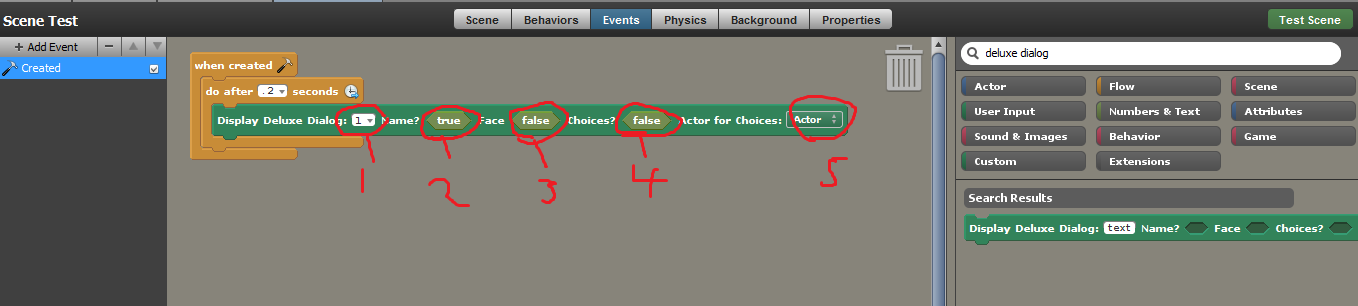
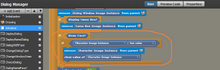
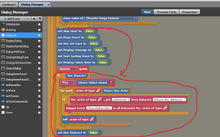
Display Deluxe Dialog: 1 Name? True Face? False Choices? False Actor IGNORE!!!!!!!!!!
If you followed these directions correctly, your screen should look like this:
We're going to break this long green custom block for you, so that you understand everything that it does. There are many dialog options in the Dialog Manager, the one that we prefer to use (and suggest that you use) is the Display Deluxe Dialog. This is simply because it contains options for each and every type of dialog possible.
As you can see in the image, we have some points in red written below the code block, which we will go over now.
1. This is the ID of the dialog we're going to be using with this block. We didn't have to enter an ID, we could have simply typed in what we wanted (but we will go over that in the end of this entire tutorial).
2. This spot to the right of the "Name?" area tells the Dialog Manager that we want to use a Name box with our dialog to display our character's name. To denote the name to use, you use the special text code of [name: Joe], where Joe is obviously whatever name you wish to use.
3. This spot to the right of the "Face?" area tells the Dialog Manager that we want to use a Face display on our dialog, to display a picture of the character that is currently speaking. Adding in a face portrait is pretty simple. Open your game's folder (you can click on Debug -> View -> Folder For This Game, to get to this folder quickly). Then click on Extras -> ERC -> Imgs -> Faces. This is where all the Faces will be stored. To denote the image to use, you use the special text code of [face: nameofimg]. All images used should be .PNG files, this is hard-coded into the ERC system.
4. This spot to the right of the "Choices?" area tells the Dialog Manager that we want to display a list of Choices that the player can choose from. This requires a slightly more complex special text code. The code would be: [choice: Hello There!~EventToTrigger~Actor or Scene]. The "Hello There!" portion is what the player will see. "EventToTrigger" is the Custom Event that will be triggered when the choice is selected, and the "Actor or Scene" is where you will type in either "Actor" to denote that this should be used in a specified Actor, or "Scene" which will denote that the dialog should trigger a Custom Event in a Scene's behaviors. We go into this a little more later on.
5. Finally, the Actor For Choices spot is for choosing an Actor if you have Choices? set to True. In our case, we want to ignore this, since we will not be using choices.
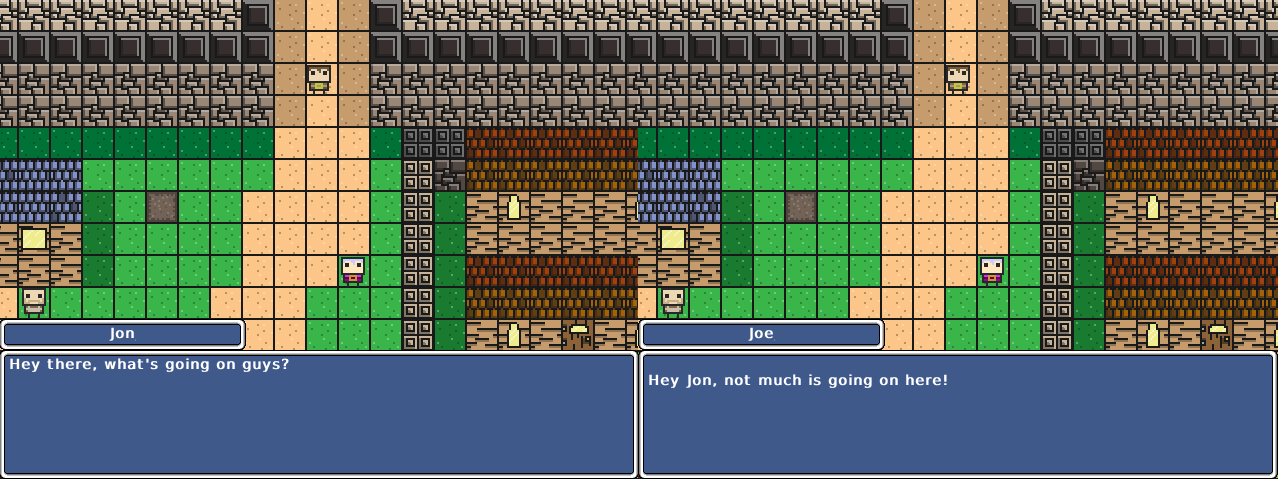
Okay, now that we have our code block set up, run the game and choose "New Game." After .2 seconds, if you have done everything shown in the image above, you should see a dialog box that looks like this (If you imported the ERC data into the appropriate folder. That is covered in the Installation page.)
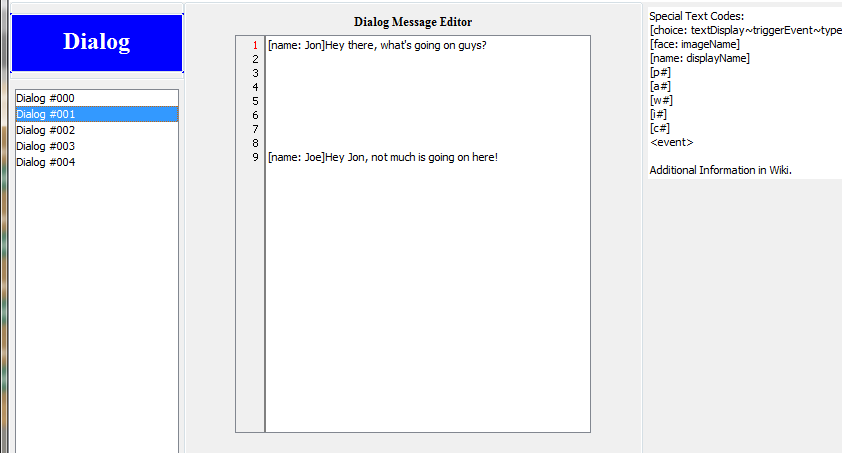
If you created a dialog just like the one seen in this image, congratulations! You've successfully created a Name Box dialog! You're ready to move onto the next tutorial, found below. If you don't get an image like this, go back to the start of the the name box tutorial and go back through the steps, ensuring that you input everything correctly. If you don't want to import the data that comes with ERC, this following picture shows you what we have written in the Dialog tab for Dialog #001.
Dialog With Name and Face[]
In this portion of the tutorial, we will walk you through how to create a dialog that contains both an image and a name box. If you haven't read the previous tutorial on how to make a Name Box dialog, we urge that you review it before continuing on with this tutorial.
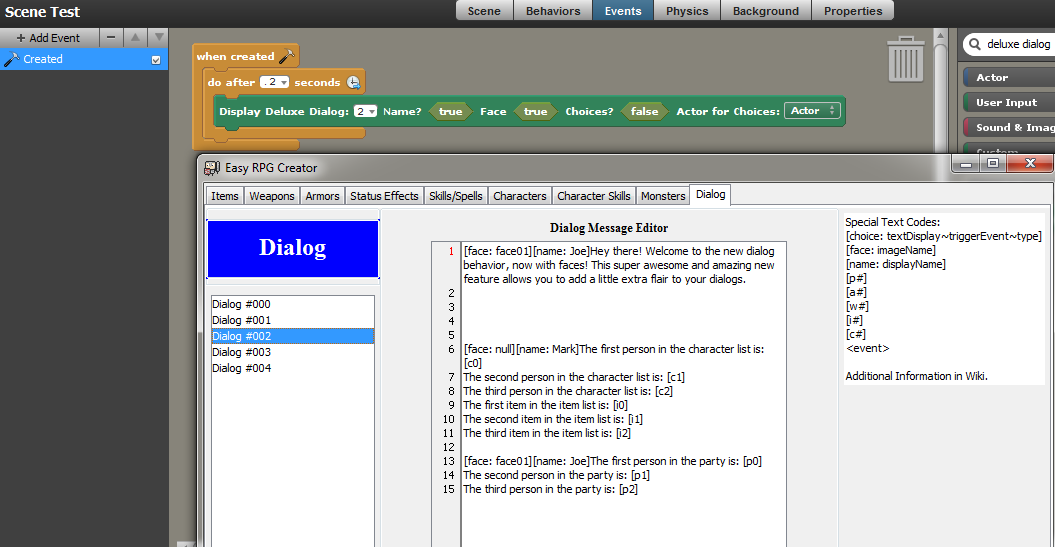
Beginning where we left off in the last tutorial, we're going to go back to the Events tab of the Scene, Scene Test. If you haven't already guessed, we're going to use the Deluxe Dialog custom block and we're going to make sure that Name? is set to True and Face? is set to True. We're also going to change the Dialog ID to 2. You should now have code (and dialog) that looks like this:
Now that the code block is set up, go ahead and run your game, again clicking on "New Game." After .2 seconds, your screen should look something like this:
If you hadn't noticed, this dialog has an example of many of the different special text codes that we have included with the ERC. More information on the special text codes can be found on the Creating a Message Box page.
If your screen looks like the one shown in this image, congratulations! You have mastered creating a dialog message with faces and name boxes! If your screen doesn't look like this, please review your code and ensure it looks exactly like the ones shown in the images above.
The Deluxe Dialog (Name Box, Portrait, and Choices)[]
For this tutorial, we'll be doing some more coding than you've seen in the past two tutorials (but not too much! Don't worry!). We're going to be making a Deluxe Dialog, a dialog with all the neat bells and whistles. We're going to be using an Actor behavior for this one, so go ahead and delete the code in your Scene Test events page if you haven't already done so-- We wont be needing it!
Before we get started here, if you are using version 0.3.4 there are some bugs that you need to go in and fix in order to follow this portion of the tutorial. Scroll down to the bottom of this page and there you will see images that illustrate how to fix the bugs that were found.
To start off, if you haven't downloaded version 0.3.4 (or above) yet, please go do so. This update adds in a new NPC and a new Actor behavior, the Test NPC, and NPC with Dialog behavior. We're going to be modifying both of those for this portion of the tutorial.
First, open up Scene Test (if it's not already open.) You should see the Test NPC in the scene, to the right of the player's character and down a little ways. Click on this actor, then click on Inspecter in the top right corner. Scroll down until you see the "Customize" check box. If it isn't already checked, click on it! You should see a list of new options displayed here. Type 3 in the box next to Dialog to Display, Check off the Name? box, and finally Check off the Face? box. There isn't an option to check off the Choices? box-- this is already set to true in the NPC With Dialog behavior and wont do anything if you don't have choices to display, so don't worry!
Save your scene with the changes made. Your screen should look like the following image:
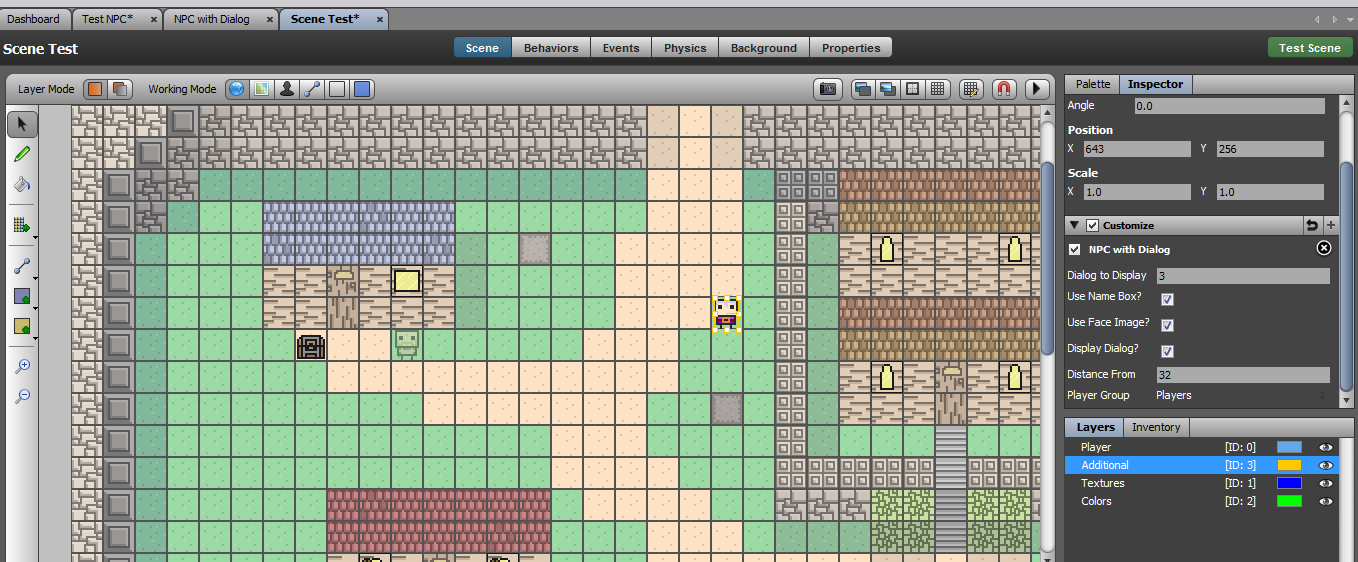
If your screen does not look like this one, please review the steps above and see if you can't figure out where you went wrong.
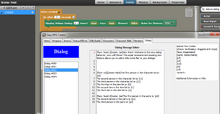
Now for the coding part! Go back to your Dashboard and go into Actor Behaviors. Open up the Behavior titled "NPC with Dialog". We're going to be modifying the code in here to do stuff when we select our choices. But before we modify the code, let's look at the Dialog we'll be using, Dialog #003. Here's what it should look like:
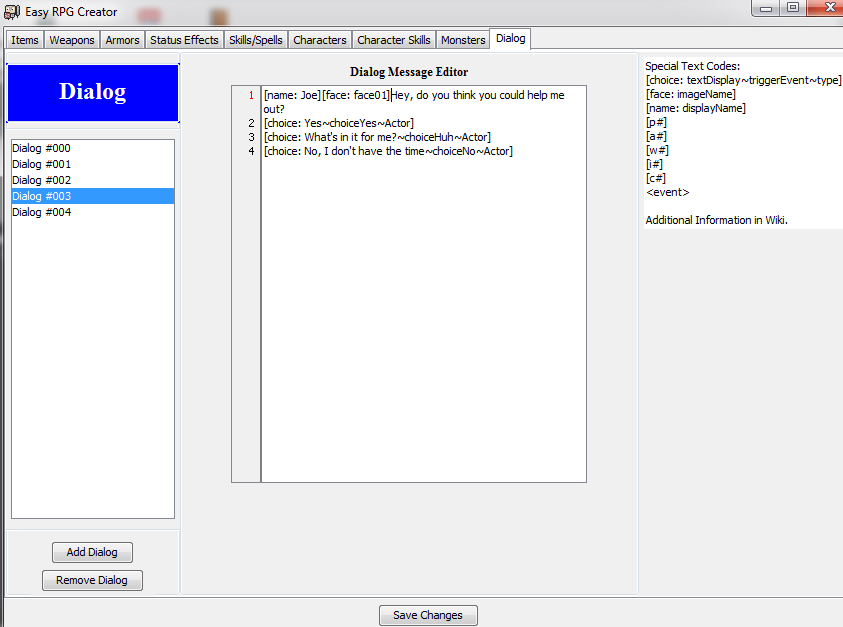
As you can see, we start with the two special text codes denoting the name ([name: Joe]) and the face: [face: face01]. But now we also are using the [choice: ] text codes. The [choice: ] text tells the dialog system that we want to display a choice for this dialog. Now, if you have a multi-page dialog like in our last tutorial (i.e. dialog between multiple characters), choices wont work properly unless it is at the very end of your conversation, like in this example. Anyways, let's get into what the [choice: ] code does.
[choice: Yes~choiceYes~Actor]
The very first thing we see here next to [choice: , is "Yes". When the game is running and the player talks to our NPC, the choice that will pop up will display "Yes" on the screen.
Next to Yes~ is "choiceYes". This is the name of the event that will be triggered when this choice ("Yes") is selected. These have to be programmed in by you, the user, which we will get into in just a moment.
Finally, we have "Actor". Since we're using this Dialog in an Actor, we type in "Actor". If we were using a scene to trigger this dialog, we would type in "Scene" to run our events.
So, now that you know what the heck [choice: Yes~choiceYes~Actor] does, we're going to start our programming!
In the NPC with Dialog behavior, click the "+" and add in a new Custom Event. This custom event will be "choiceYes". (So, when choiceYes happens). Now beneath that, add in the Deluxe Dialog custom block. This time, instead of using the ID of a dialog from the Dialog tab, we'll be showing you how to type in your own message. Type in the following next to "Display Deluxe Dialog:": [name: Joe][face: face01]Thanks!
Next, set Name? and Face? to TRUE, and Choices? to FALSE. Ignore the Actor box.
That wasn't too bad, was it? If you followed these instructions correctly, your screen should look like this:


Next, we're going to create two more Custom Events. If you haven't already guessed, these will be choiceHuh and choiceNo.
For choiceHuh your dialog should be: [name: Joe][face: face01]Well, I don't know!
Also with Name? and Face? set to true and Choices? to false.
For choiceNo, your dialog should be: [name: Joe][face: face01]Well, thanks anyways!
Also with Name? and Face? set to true and Choices? to false.
Your codes should look like this:


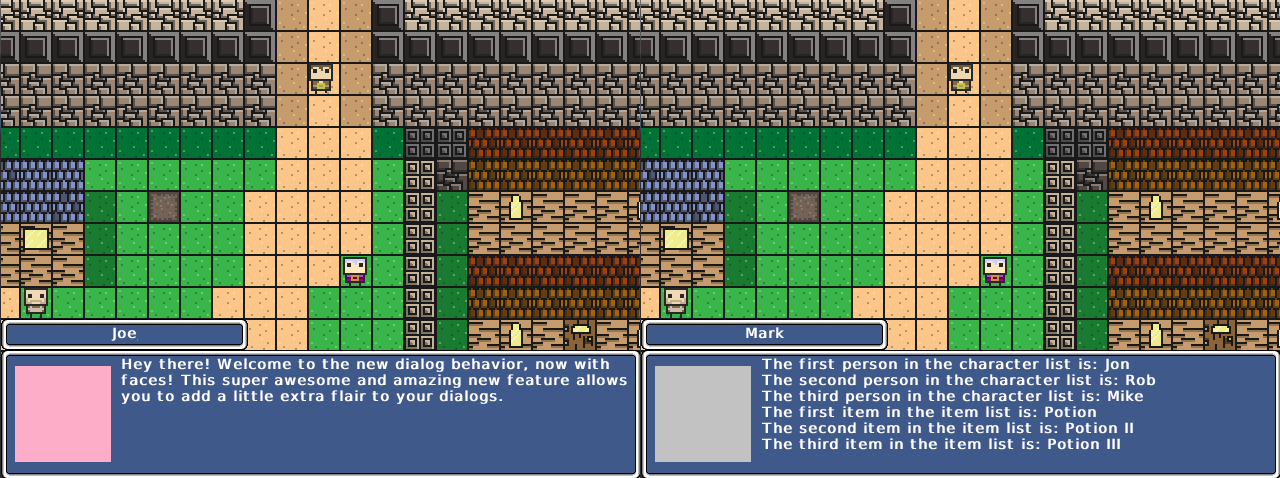
Save your game and start it up. Click on "New Game", walk to the Test NPC, and press Either 'Z' or 'Enter' when you are right next to the NPC and you should see the following, provided you followed the code correctly.


Go ahead and click on all of the choices, using 'Z' or 'Enter' and ensure everything looks like it does in that image. If it does, congratulations! You're now a master of creating dialogs! If it doesn't look like the above pictures, review this tutorial and ensure that you entered everything correctly.
Bug Fix for v. 0.3.4[]
NOTE: Version 0.3.4 contains an error in the Dialog Manager that will not allow you to properly use choices. This bug has been fixed. There also has been an update in the displaying of choices if you have your window set to display at the bottom of the page. If you are using Version 0.3.4 and want to fix this bug, please review the following images for code changes that you need to make in the "Advance" event in the Dialog Manager behavior.
Fix #1:

Modify the if Draw Face to look like this image.
Fix #2:
Also in the Advance event. Move the following code to this new position.
